Friday, September 14, 2012

Picante Chicken and Rice

There are a few recipes that bring back fond childhood memories for all of us.  This is one of mine....  I can't remember if my mom found this recipe of the label of the Pace picante sauce, or if is was on from one of those every-ingredient-is-a-brand-name cookbooks, but man is this stuff go-od!

It started with her following the recipe (which I'm pretty sure is how she still makes it), but leave it to me, either being creative or cheap (depending on the night), to make substitutions and play around with cooking methods.  

This is the original recipe:
~~~~~~~~~~
Sweet and Spicy Picante Chicken (from pacefoods.com)

prep: 15 minutes
bake: 20 minutes
serves: 4

Ingredients:
1 1/4 pounds skinless, boneless chicken breast halves 
1 jar (16 ounces) Pace® Picante Sauce 
3 tablespoons packed light brown sugar 
1 tablespoon Dijon-style mustard 
1 cup regular long-grain white rice, prepared according to package directions (about 3 cups)


Directions:
Heat the oven to 400°F. Place the chicken into a 2-quart shallow baking dish. Stir the picante sauce, brown sugar and mustard in a small bowl. Pour the picante sauce mixture over the chicken.
Bake for 20 minutes or until the chicken is cooked through. Serve the chicken and sauce with the rice.
~~~~~~~~~~
Last night's version; made with chicken leg quarters
(a whole leg/thigh in one piece)

Over the years I've tried all kinds of new things with this recipe, and it is *always* tasty!  Here are a few of the changes I've made:
  • organic salsa - just 'cause it tastes better to me (I bet it'd be good with homemade or home-canned salsa, too)
  • double the sauce, then there's enough for dipping if you like
  • brown rice or even quinoa instead of white rice
  • cubed chicken breasts (makes of quick-cooking!)
  • canned chicken breast, drained (even quicker cooking!!)
  • stove top cooking- use either sauteed, cubed chicken breast or canned chicken (drained) and just cook the sauce down until it starts to thicken
  • (last night's version) chicken leg quarters (takes longer to cook, but tastes phenomenal) ...this required baking, then removing the chicken from the sauce and cooking the sauce down further on the stove top, but it was totally worth the extra time/effort.  Delicious.
  • thighs or legs would work fine as well
...just remember to adjust cooking times accordingly for whatever cut of meat you use.
...and ALWAYS check the doneness (is that a word?) by using a thermometer to test the internal temperature of your meat - chicken should be cooked to 160º-180º F (I err on the side of caution and cook mine to to 180º).

Sunday, August 26, 2012

Baked Apple Pork Loin Chops...


Baked Apple Pork Loin Chops

  • 8, tart, crisp apples, peeled (4 roughly chopped, 4 sliced thinly)
  • a little bit of water
  • 1/4 tsp. pumpkin pie spice, divided in half
  • 1/4 tsp. summer savory or thyme
  • 1 tsp.brown sugar
  • 8, 1" thick pork loin chops
  • a small bit of oil for searing chops

Preheat oven to 350°

Place chopped apples and a little water (about 1/8th of a cup to start) in a small saucepan, simmer until apples soften (adding more water during cooking if necessary).  Mash apples with a potato masher and stir in half of the pumpkin pie spice and the brown sugar.  Congratulations, you just made applesauce!

Drizzle a little oil in a frying pan and sear both sides of each pork chop.

Toss the sliced apples in the savory and the remaining 1/8th teaspoon of pumpkin pie spice.

Spread half of the sliced apples on the bottom of a large baking dish.  Lay the chops on top of the apples and slather each chop with a spoonful of applesauce.  Top with remaining apples.  Cover with foil and bake at 350° for one hour.  Uncover and continue to bake for another 20 minutes. 

Allow to rest for 5-10 minutes before serving.  When you serve it, be sure to top it with some of the apples that were at the bottom, too.  Yum!


Back to school!!!

Yep, it's that time of year again!  I had the joy of sending my little ladies off to their new first grade and third grade classes on Wednesday, and mister O gets to start at his pre-K class on Monday!  What am I ever going to do with myself with no kids home for half the day???  ...my hope is that I'll get more housework done...

In preparation for school,
the girls spent some time making a WHOLE BUNCH of hair accessories!

Here is my girls' debut as bloggers; a tutorial on hair accessories:


Rye: We made alooooot of crafts!

Moo: Mommy helped us with our hairbands and such...

Rye: ...and we were late for dinner....

Moo: We used barrettes and hair ties,
and for some of the hair ties, we wired beads on.

Rye: I wired beads on a headband and it is really pretty....
and we did a lot of headbands.
We also hot-glued beads and jewelry glued this really pretty headband,
and it has a matching hair tie.

Moo: I made a Hello Kitty headband, it has Hello Kitty ribbon on it.
We hot-glued the ribbon on so that it looks wavy.
We put little dots of hot glue on in different spot and we pressed the ribbon onto the glue
- and then we did it to both sides.

Rye: I made a barrette with a hot glue gun,
but I found the button yesterday...  it came off of the barrette.
I learned to not put a button on a barrette using hot glue.
I should have used a wire or jewelry glue.

Moo:  I made a purple, fuzzy headband with some trim
that you could put on lamps or on the bottoms of purses,
because Riley and I were talking about maybe doing that for our next project.
I made the headband by taking some trim and I jewelry glued it to a headband.
I had to pinch it really tight so the trim wouldn't move while it was drying.
Then, I took some of the excess trim and then I, um, took a purple hair tie (so it would match)
and I found a wire that would go with it -I like yellow, so I did a yellow wire- it was a small wire.
I wrapped the wire around the trim and then I twisted it onto the hair tie.  

Rye:  Mommy made this pretty clip.
It had gold trim on it, and ribbon flowers.
She jewelry glued it all onto a clip.  

And she made a big barrette with a button holding some feathers together,
she hot-glued them and then jewelry glued the hot-glue onto the barrette.

Moo:  I have a tip for people who use barrettes for crafts;
don't hot glue the  stuff down.
You should use jewelry glue because hot glue and metal (or plastic)
don't stick to each other.
Hot-glue the, like, feathers together and then get your barrette ready
and put some jewelry glue on it after the hot glue is dried.


Please give my girls feedback and let them know how they did!  Thanks!  <3

Monday, August 6, 2012

Going wedding crazy....

...Seriously, now.  As much as I'm looking forward to our long overdue BIG DAY, the whole thing is driving me mad.

~late night meltdowns over petty little things

~a nearly week-long mini-freak-out because (ohmygod) there's a latrine at the forest preserve we booked for our venue.  I mean, seriously, it's a forest preserve...  have you ever been to one that *did* have a flushing toilet?

~ we need HOW much tulle?!?!

~100 4 ounce jars of jam, not to mention cutting out all of the fabric and the vellum toppers I designed

~two three bouquets that I'm hand-making from ribbons, laces, muslin, etc.  ....can't forget to make one to toss!

~Is my dress going to be finished in time???

~WE STILL DON'T HAVE A MUSICIAN BOOKED!

~budget budget budget budgetbudgetbudgetbidgetbidgerbujdfer

Gaaaaahhhh....  and it's ten to two in the morning and I just finished canning some stock.

Pictures of all of this wedding madness will be up soon.

Tutorial(s) coming soon as well.

Goodnight.

Wednesday, July 18, 2012

The other day, the kids and I spent some time doing crafts together...


The girls each painted a disney princess figurine (Rye did cinderella and Moo did Belle).  

O colored a Spiderman picture and a frame for it.

Since it took the girls a lot longer to finish their craft, I had O help me with a few of the wedding decorations that need too be done for my tooquicklyapproaching wedding.


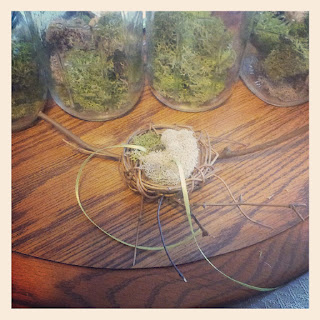
First, he put together his ring bearer "pillow" - which consisted of:

a small bit of dried moss

•a ready-made nest

•a short length of thin ribbon or string (about a foot and a half is more than enough, you can always trim it later)

•tacky glue or hot glue

We started off by threading both ends of the ribbon through the bottom of the nest so they came up through the top center of it next to each other, but with a stock or two between them so there was something to help hold them in place. Then we knotted the ribbon and positioned the moss in the nest so that the two ends of the ribbon had a little space between them, that way the rings will have somewhere to sit.  Finally, we glued the moss into place, let it dry, then O got to practice his job for the wedding!  He was so proud!

We had lots of moss leftover, so why let it go to waste? 

O stuffed the rest into jars until I told him they were full enough.

Some of  the jars we used were hanging jars that my mom and I made a few weeks ago...  They're pretty quick and easy to make.

...I plan on doing a tutorial on the hanging jars sometime in the very near future...

I still have one big furry-looking chunk of moss left, but I'm not sure what I want to do with it yet...  I'll figure something out, I'm sure.

Monday, July 9, 2012

So far behind....

I feel like I'm a bad blogger...  There's so much that I could have been posting over the last few weeks!  I still have to post about my mom's and my mother-in-law's birthdays....  And my own! 

Not only has life been busy, but my computer suddenly decided to start being fussy.  That, in addition to the blogger app kind of sucking had led to my lack of posts as of late.

I sincerely apologize to anyone who reads my blog regularly and I promise to get back to posting more regularly as soon as possible - please keep in mind that I have a late September wedding approaching far too rapidly, so "as soon as possible" could mean whenever I'm done sending out thank-you notes.  Haha.

But seriously, wish me luck... 

Monday, June 25, 2012

Mmmmmojitos....

2 qt. [4 qt.] Mojito recipe

2 [4] limes

Mint leaves (a good handful [or two])

1 [2] liter[s] club soda - 33.8 fluid ounces [x 2]

3/4 [1 2/3] cup[s] white rum

Simple syrup: 1 [1 1/2] cup[s] each sugar and water, gently boiled together just until sugar dissolves into water

Muddle (smush together with a wooden spoon or muddler if you have one to release the oils and juices) mint and limes in two 2 qt. pitchers or mason jars.  Pour simple syrup and rum over muddled mixture and stir.  Add soda and stir gently.  Add ice as desired.

Enjoy!